Monday, April 23, 2012

Artistic8

After leaving this blog abandoned a part of this team has decided to open a new site - Artistic8. We are proud of the quality of the posts, and would like it if you checked it out! A few previews of the articles are:
And some visual previews of course!


Saturday, September 25, 2010

Love is Here

Click on the image to view full size. I used stock photo's for little parts of the meteor, the nebula and the clouds. 
post signature

Thursday, July 1, 2010

Photoshop Tutorial - Gradient Maps

Here is a tutorial that has been posted by Jeremiah Mark Treibel, Original post HERE, and I thought that maybe you guys could learn something of it. 


A Gradient Map (Pronounced Grade-e-int Map) is created when Photoshop analyzes your image and finds the high points and the low point. It then maps colors determined by you to those specific high points and low points. It is a fairly basic adjustment layer in Photoshop that can yield amazing results when used correctly. The untrained usage of a gradient map will usually make your image look worse. Today I am going to show you how to sharpen your skills and add another tool to your belt, the Gradient Map.
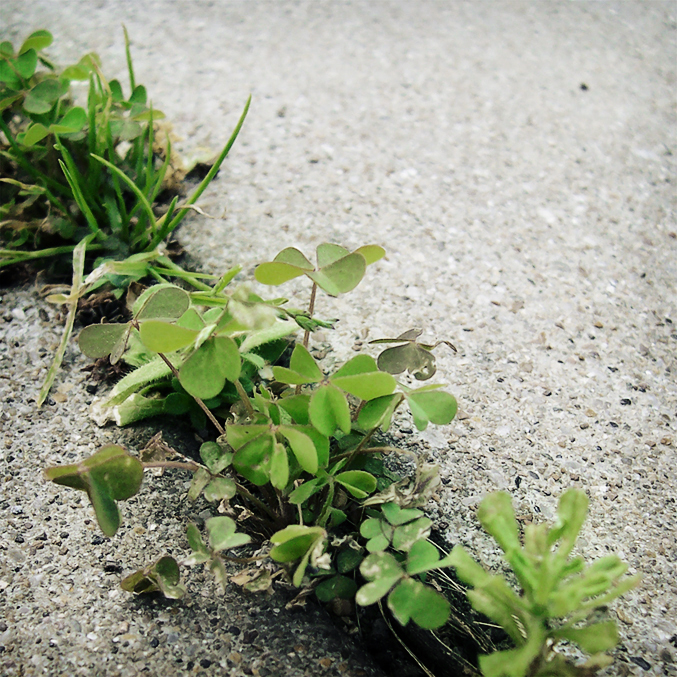
1.

Begin by opening your image in photoshop. Have you seen this image before?

2.

Select the “Create new Fill or Adjustment Layer > Gradient Map” option on your layers palette.

3.

Once the gradient map tool pops up, click on the big gradient and Photoshop will open up a larger more advanced tool for making your Gradient Map.

4.

As you can see(assuming you are using the default colors) the left side change the dark parts of the image to the colors you choose, and the right side changes the light parts of the image to the colors you choose. To see the basics of editing a gradient map check out this tutorial. (you only need to look at steps 2 and 3)

5.

Now lets apply this knowledge to our Gradient Map. Click the black slider and drag it to the right a little. This will increase the overall contrast of the image. You need to change the color of the black slider to some other color, I have used a navy blue.(#084669) Now you need to find the point in between the blue slider and the white slider and click to make a third slider. Select this slider and make it a pale yellow.(#fffbc1) Once your done Click “Ok

6.

Now that you have created a gradient map, you need to learn how to apply it to your image in a way that makes it look better. I suggest playing with your blending modes. Every blending mode will have a different effect on your image. The more you play with these options the more you will become familiar with their functions. Once you find a blending modes that creates the effect you desire, play with the opacity of your blending mode to make the stylization more subtle. On my image I have used the blending mode “Soft Light ” at an opacity of “75%.”
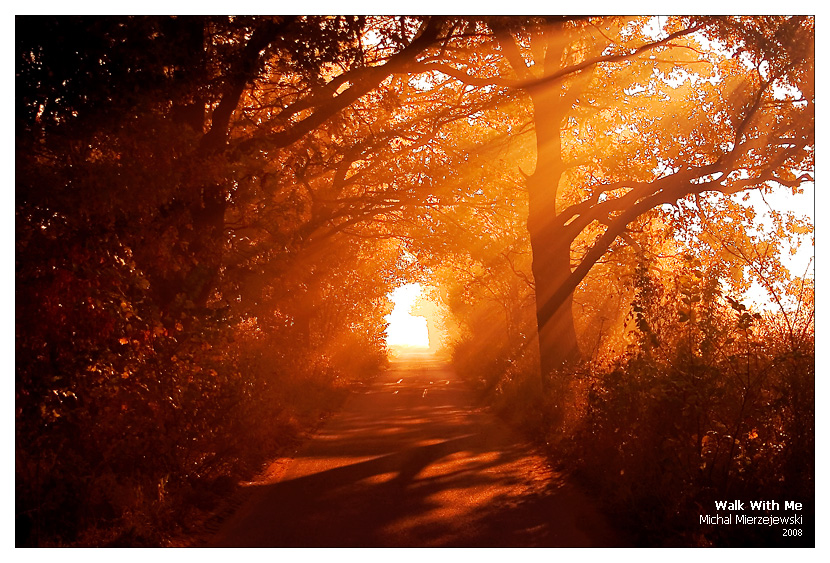
7.

You have done it. You have made your first Gradient Map. Now, go back and change something. Find out more about blending modes. Find out what happens when you use two different blending modes. Explore. Make something unique, something different.
post signature


Thursday, June 24, 2010

Prisoner of my own

Hi there! While I was browsing DA I found this rather interesting piece of art made by shimoda7.

Description by artist: 
Yes, this is the drawing that Shia LaBeouf has tattooed on his ribcage.


This drawing is about being a prisoner of your own actions and choices. It shows how I felt when I was going through a tough period in my life.

- graphite on Lana drawing paper
- photo reference (my own hand)
- about 12 hours
- 12" x 9"

Hope you like it.

Of course we want your opinion about this piece of art. Don't be afraid and comment.

Wednesday, June 16, 2010

Typography Guide - RenzGFX

This tutorial was fully made by RenzGFX, all the credits go to him, do not show this guide on a different site. (Click for full size because I'm having some trouble with Blogger)  Here is more of this great artist: http://renzgfx.deviantart.com
xxxxhhhhhh


post signature

Saturday, June 12, 2010

Work Beats Talent

See the little signature in the corner? (Click on it for full size if you can't.) It will be placed under every post starting today.

Friday, June 11, 2010

5 Tips for Photographers!

Enjoy the tips.


TIP 1: GO OVER THERE
Go closer to the subject(s) to gain a realistic view. This could be lowering yourself to your dog's height, or moving closer to the car you want to capture.


On this photograph you can see that the photo camera was moved to the height of the pigeon, and that it was also zoomed (or brought closer) to gain a great closeup. The great photo named 'Curious' was made by Theshinyrock on Deviantart.

TIP 2: BE FAST
Just be fast in some cases! Your subject may stop smiling, move, bolt, fly away, or whatsoever. Don't wait until you know 100% that all the buttons' settings are correct, edit the photo later if you really want to.


If this photo was taken a second or two later it could have been too late. This photo was taken by Georgitanev on Deviantart.


TIP 3: BE SMART, BE SIMPLE
Don't use all the functions your camera has. Just keep it clean and simple. But don't rely on a fully automatic setting. Go change some things, but be smart, be simple.


SETTINGS, by Hampalampa on Deviantart.


TIP 4: FOCUS
If you think about it, everything in life can be made as an interesting photo. Some thing that may seem boring at first, can be changed to a great photo with interesting insides. 
It's really easy to just photograph anything. The hard part is to make it interesting. Select only what you want in your photo. There can be side things, but do put the focus on your main object.


FOCUS, by Shimp.


TIP 5: DONT FEAR
Don't allow yourself to be paralyzed by fears of using the wrong settings and such. If you are afraid of upsetting someone by taking their picture, just go up and ask if it's okay. Nine of the ten times they say ok. But don't go secretly snapping photo's of people when you didn't ask him/her yet. 


-Justphotoshopping Team

Wednesday, June 9, 2010

Photoshop Tutorial - Soft Blue Effect

In this tutorial we will go from this picture:


To this picture:


Step 1:
Click the little icon in the corner of your layer palette (Shown below) and then click 'Gradient Map'. 


Now choose a blue color like I did (Also shown below), and black.
(Click for full size)


Step 2:
Okay, go to Image→Apply Image. Hide the Gradient Map layer by clicking on the little 'Eye' next to the thumbnail of the layer.
After that, go to Filter→Blur→Gaussian Blur. Enter about 8,4 px. Put this layer to Soft Light, and you are done!

-Justphotoshopping Team

Thursday, June 3, 2010

Interview with RicardoFX

Why interview only the professionals? This is an interview with RicardoGFX, and he is an great upcoming Photoshopper. I hope you will enjoy reading this interview.


© The artwork presented on this post is used with the permission of its author, RicardoFX. All the artwork is copyrighted. Please do not use the images without the permission of the artist or owner. 


Thank you for agreeing with taking this interview, do you have any things to say beforehand?
I would like to thank once again the opportunity to talk a little bit of my work for those peoples who enjoy and always comment job. Thanks :D


Could you introduce yourself please?
My name is RicardoFX, I'm 33 years old and am self-taught in digital art,I'm living in Rio de Janeiro/Brazil. Digital art is still just a hobby for me this is not my real professional activity,but I can not imagine my life without digital art.My main software is the Photoshop, I have an original version of Photoshop Cs2, and everything I do use it,and also drawing with pen and paper and scan the images, making the most of my shapes and some brushes. Sometimes I use illustrator too, but I'm still learning this software. Now I'm thinking about buying Photoshop cs5 and a Intuos 4 Tablet to improve the quality of my projects.and always keep searching for inspiration and observing trends and new artists.


Hip-Rapper: This was a very common style of work in digital art. I created some vectors and used smoke effects, of course, all this with an excellent image of stock.


When have you started with Graphic Designs? Can you tell us how you first started Photoshopping? And since when?
I started with Photoshop two years ago. That was when I needed to do a job for the shop where I work and since then I fell in love with Photoshop and Digital Art. Now, with the little time I have try to improve my knowledge.


Where do you get your inspiration?
Music videos clips are my greatest source of inspiration. I love hip hop and I love music. I also really observe the work of the masters of digital art.


Is there something you would like to say to just beginning designers?
What can I say? Never give up to doing what you really like. Never give up your dreams, NEVER...


My World: This work was a mixture of different techniques, such as illustration, vector and mask.that´s all ;D.


What program(s) do you use to create your work?
My main program is a original version of Photoshop cs2. I'm thinking of upgrading to version cs5.sometimes I use another program like Illustrator for example.
My main editing program is Photoshop. I currently did many designs with free hand and turned them into a vector to use in my projects.


Are you working on a project A.T.M.*? Can we see a little fragment of it?
Yes, but unfortunately I cannot show you a preview. A photographic studio based in Switzerland has commissioned some work and I am currently developing the second. Perhaps after the commercial release of work, I can show it in my portfolio. I'm not creating any personal art currently.
*A.T.M. = At The Moment


Have you already seen Photoshop Cs5?
I'm outdated, because my version is still the CS2, but I hope to upgrade my Photoshop to version CS5. I have not seen but have heard good feedback about the new version.


What is your favorite band?
My favorite styles of music are Hip Hop and Gospel. Kayne West, Kid Cudi, T.I king and 50 Cent are my favorites rappers.


Swirls: Here I wanted to make a clean and clear work.I took a pen and paper and drew some elements that wanted to use, so I scanned and placed with the image.all elements of the work was hand drawn and digitized.


Do you have a favorite color?
I do not have just one favorite color. I like the mix of all colors.


What are your hobby’s besides designing?
I love physical exercise, I do daily exercises in a gym, and the best part is being together with my fiancee.


What was your first piece of ‘art’?
I honestly do not remember very well, but it sure was not very nice to see :) hehe.


dance with me: This was another clean job and with a very nice end result.I used in this image water paint,displace effects and a stock of butterflies.
Who is your idol?
This one is easy to answer: JESUS


Thank you for this interview.


© The artwork presented on this post is used with the permission of its author, RicardoFX. All the artwork is copyrighted. Please do not use the images without the permission of the artist or owner. 

Tuesday, May 25, 2010

Photoshop Tutorial(s) - Paint and halftone effects

Paint effect
Welcome to this tutorial where you will learn how to give a a painted look to clothing and such.


Step 1:
Get a picture with a white background background, like this one:


Step 2:
I chose to select every color of the clothing (I'm also going to select  head and hair) in separate layers, which makes it easier to edit later and gives a better result. The selection process can easily be done with either the pen tool (see this tutorial) or the polygonal lasso tool (zoom in until you see pixels). Once you've selected everything in seperate layers go to step 3.


Step 3:
Choose the first layer you want to edit, I decided to take the yellow one. Now go to Filter→Blur→Blur more  so the effect looks better. After that use Filter→Brush strokes→Crosshatch. I used: Stroke length: 9, Sharpness: 6 and Strength: 1. After you've done that it should look like this:


It doesn't realy show when you do just one layer
Now apply this to every colored layer, but not her head or hair. It should look more like what we want now, this is what it's supposed to look like:


Step 4:
Now there's probably something bothering you, why did we not just apply the same trick to the face? Simply because it doesn't turn out right. When you apply the same filters to the face layer you would get this:

And making this girl the joker is a sin! (I used crosshatch twice to make her scarier.. Why so serious?)
So instead select her face, and apply these filters on her: Filter→Blur→Blur more and Filter→Arstisctic→Dry brush (Brush size: 2, Brush detail: 8 and texture: 1)
Use the eraser to tool to delete her eyes on the layer, and you've got you're done with adding the painted effect (don't forget to show the lowest layer to). Here's my outcome:


Halftone effect
Now I'll show you how to create a halftone effect, I'll use the same picture since it's easier.
I'll simply make a new layer, apply my image and use 


Filter→Pixlate→Color halftone.


There are quite some settings you can change, but I'm not really planning to explain them. Since I don't have a very high quality image, I'll set the Max. Radius to 4 and to keep it simple and get a nice effect I'm going to put all the channels to 25. What you've got now is probably not realy looking good.. Here's what happend with me:


Obviously this isn't what I want it to look like, so I deleted all the white parts and the middle of the girl, and now it looks like this:


Hope you enjoyed these tutorials and please comment with your outcomes if you like them!
~The Just photoshopping team.

Monday, May 24, 2010

5 Ways to overcome your Creative/Artistic block!

An artistic or creative block can be one of the worst things for a designer, painter or any other artistic. But suffering from an artistic/creative block doesn’t mean you’ve lost your artistic ability. Here are 5 golden tips on overcoming your creative/artistic block.


TIP 1: READ AND WATCH
Read books and watch movies. You will be suprised how much inspiration will flow into you. Pause the movie for a while, take a good look and start drawing. 
Are you making the tragic love scene, or the fight scene between two heroes?


A piece of art based on the final battle in Harry Potter, created by Nebezial on Deviantart.


TIP 2: TIME 
Take your time to think of something you can create. Don't rush into things, if you don't have enough time, don't even start at all. 


Just TIME, by Natdatnl on Deviantart.


TIP 3: VARIATION
Don't be afraid to try the weirdest things out! They might end up very beautiful. It will also learn you lots of new things.


Styles can change..


TIP 4: DO SOMETHING ELSE
Go outside, take a walk and just don't think about anything art related.


Walk With Me by Michal Mierzejewski.


TIP 5:
Make work on a more regular basis. Example:"I am going to make 2 pieces in this week." 
You will learn to repeat some steps by this technique, because 2 pieces a week is a lot.


I'm Busy...created by Arseni


I hope you enjoyed this post, and now go overcome your block!


-Justphotoshopping Team